
Guide to Making an Old School OWB Holster
(with reinforced mouth, sight ramp and pigskin liner)
by Blue68F100
Material List:
- 2 sq ft Vegetable tanned 8/9 oz Leather #2 Grade
- 1 sq ft 2/3 oz Pigskin for a liner. (Optional)
- 4 oz Leather Dye
- Edge Coat or heel dye
- Waxed Thread
- Leather Cement (white water based glue) and/or Contact Cement.
- 1/8" Black Lace (Optional)
- Concho (Optional)
Tools Needed:
- Construction paper
- Scissors are highly recommended, heavy duty
- Utility Knife with new blade
- 2 Needles for the thread
- Diamond Punches for stitching holes (1 and 3 prong)
- Spray bottle with Water
- 1/8" chisel punches (for lacing, Optional)
Intro:
There are many ways to build a gun holster. You can go very simple to very complex. Most of my holsters are Old School with reinforced mouths, sight ramps and pig skin lined. I also do lace work to dress them up and on a very rare occasion I will do some simple pattern tooling.
Leather selection:
I prefer to use a #2 grade vegetable tanned leather, from the center of a hide know as the bend section. Vegetable tanned leather must be used for the casing/molding process. Other tanning process uses acids and other chemical that can repel water in the casing process. The #2 grade will have scars and other imperfections. To me, this gives the leather character. Sometimes this grade can be very clean to border line #1 Grade. You can use a Herman Oak or Oak Leaf tooling leather if you want, but its cost quite a bit more. Tooling grades have more oil in the leather besides being clean. DO NOT USE THE SHOULDER AREA FOR MAKING HOLSTERS. This leather is very flexible and will not hold it's shape. I use 8/9oz thick leather (1oz = 1/32") as a minimum for all holsters except pocket holsters. I have even used heavier leather for big heavy revolvers. Just to make things interesting, cows can't grow their skin so it's consistent. You can cut pieces from the same side and next to each other and they will act totally differently. This shows up when your dying leather as well on how it stretches. I like the rustic look so imperfections/battle scars just give the leather character. I think it's crazy to spend the money for a high end tooling leather that your going to dye dark so you could not tell what grade it is. Leather has a grain in it that will allow it to stretch more one direction than the other. Knowing this can make it a little easier to case (mold) the leather. It does not play a big part with holsters but can make life a little easier.
Dyes
There are 2 types of leather dyes, water based low VOC and oil base. The Pro dye is the best. The low VOC easy of use than the oil base dye. To get a even tone you need to use a cleaner prior to dying. Oil based dyes penetrate the best but can leave a dull chalky surface that needs to be buffed. It's very dependent on how tight the surface grain is and the dye color. Oil base will give you a very durable finish, but does require you to buff the surface to remove a chalky residue. You must keep it off of the flesh (rough) side, you will never get the chalk out. And it will transfer to whatever rubs against it, too. USMC Black is the worst but it has a beautiful deep luster once buffed out. Adhesive and water will not penetrate oil dyes, so it must be applied after the project is finished. Or you can mask a area to keep it free of dye. If you need to glue over a oil dyed area you need to scuff the surface first. Alcohol base dyes are easer to use. It does not penetrate as deep as the oil dye but does not have the chalky dull finish either. It will have a dull finish but rubbing it with a rag and it shines up easily. It's the easiest for a novice to use.
Thread, Needles and Sewing Punches
Waxed thread comes in 4 colors, white, brown, dark brown and black. I recommend the use of a saddle stitch (1 thread & 2 needles). This stitch with the waxed thread will stay put, and is easy to do. A lock stitch is what most sewing machines do, 2 threads. The sewing awl also does a lock stitch. You can use one but you will be required to have the holes punched prior to stitching. I recommend using a 1 & 3 prong punch with at least a 1/8" spacing for stitching. On straight runs, over lap your holes to keep a even spacing. Meaning put one prong in a already punched hole. I use these punches. The use of a divider is good for putting a light scribe line for a guide. Calipers can be used to do this too. I normally use a 1/8" offset from the edges. There is also a tool that are used to recess the stitching. These can really give a holster a nice clean look but may be hard to use in some location. There is a tool for laying out stitching but it is not needed for this project.
Adhesives
There are 2 types of adhesives that I used, water base (white) cement and contact cement (Barge Multipurpose Contact Cement). Water based adhesives penetrate and bond to the leather extremely well. The joint is actually strong enough that you will tear the leather if you try pulling it apart once cured. You also have a little work time so you can move the parts and reposition before it sets. I use this type of adhesive a lot. Being water based you can clean it up if you get it where you don't want it. Dyes will not penetrate through a glue drop or smear. So you must promptly clean it up if it gets where you don't want it. The negative is that it can come apart if soaked in water for extended time. Contact cement is great when you want to parts to set quickly. It gets stronger with time, and repels water. This is what I use when I setup a sweat block using pigskin and for pigskin liners.
Edge Prep and Coat
Gum Tragacanth is a gum based liquid that is used to slick up edges and leather. This is the same as a Holster Slick that some holster mfg sell. I use this most of the time when I do edge work. I cover the edge smoothed out with Edge coat which is a dye design for covering edges. It's thicker with more pigment than standard dyes. Heel dye used on shoes is similar. Standard dye can be used here but it does not cover as well. If you use a standard dye for this, you must use water to slick the edge. Finishing all of the edges is what makes a holster look 1st class.
Here's how to finish the edge.
- This can be done many ways from using a burlap sack, water and elbow grease. You can use a sander, wood sanders work perfectly, what I use. Some sanders/belt grinders used for steel have a faster belt speed, which can burn the leather. Course grits work best with leather, 36-80grit. A Dremel Tool with a small sanding drum or diamond stones work too, though very fine. Drill press with sanding drums work if you don't have a belt sander. These are nice for making uniform curves.
- Once the edge is cleaned up, I use a small beveller to knock off the sharp edge. This can be done using a Dremel tool with diamond cutters or ever die grinder bits. But you need to be careful not to stay in one place and remove too much.
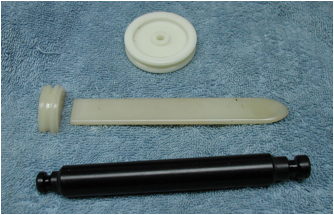
- Now it's time to make it smooth. This is done using water and a slicker tool. A slicker tool is just a piece of smooth plastic or bone. You dampen the edge with water or Gum Tragacanth then you rub it with the slicker tool till it's smooth's out. The slicker tools are setup so they have radius edges to round the edge if you used the edge beveller. The black tool below I made on a lathe. It's setup to smooth 8oz leather, and double thickness. Being a small diameter I use it in tight corners.
Now lets get started
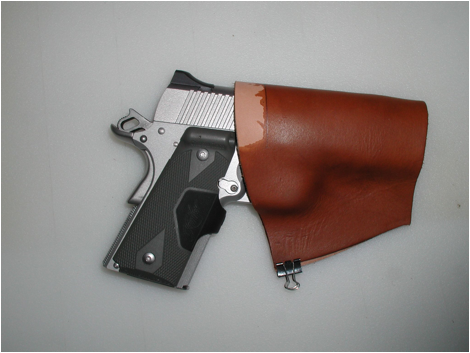
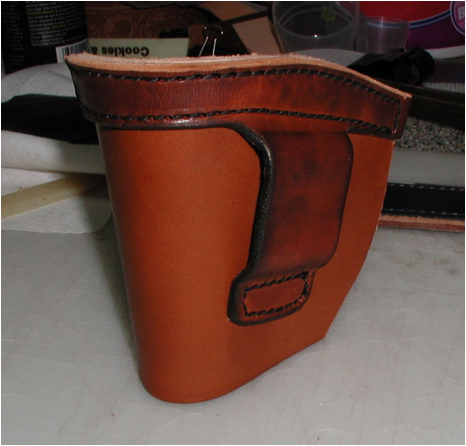
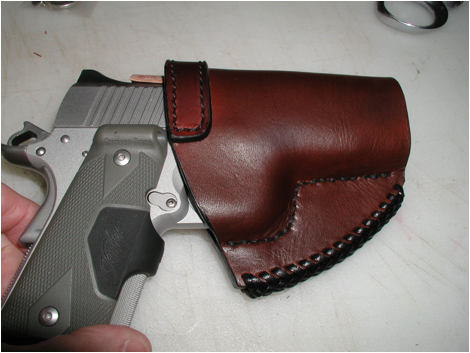
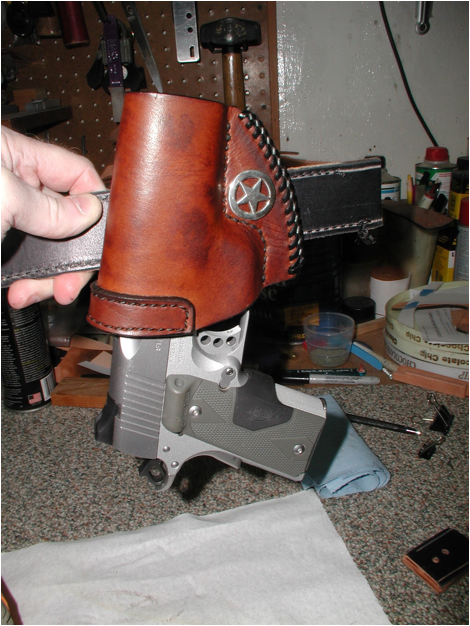
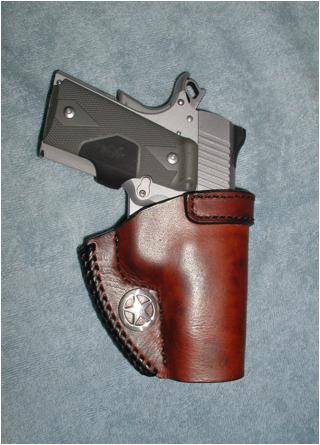
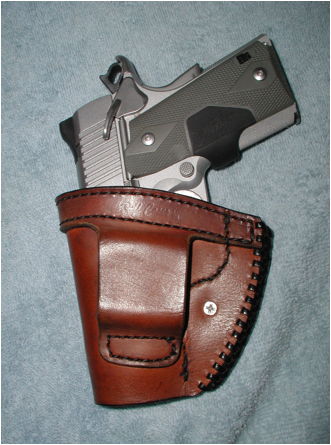
I'm making a OWB type holster with a reinforced mouth, sight ramp and a pigskin liner for a Kimber Ultra Carry II.
Decide how much of the gun you want covered, aka trigger. Left or right hand draw, cross draw, cant, etc.
1. Wrap a paper towel around the gun to make a pattern. Use a felt tipped marker and mark where you want to cut. This should be approx 1" extra for the edges. Cut out the pattern and see if your happy with the general coverage. You want this to be over size so you can tweak it if needed. Remember the paper towel is going to be the inside dimension. The outer edge with the leather will be at least ¼" longer. There are pattern books you can buy. These are pretty nice if you're going after the old west look. A pattern will save you a lot work.
2. Cut a piece of leather using your pattern. I use scissors for this but a utility knife can be used but will not be as easy.
Caution: Wet leather can be marked easily with your finger nails. If you have long finger nails you may want to wear latex or nitrile gloves to keep from marking up the leather. To see how easy leather can be marked just dampen a scrap piece of leather and see for yourself.
Need to Know: Leather does not like having sharp 90° bends. Doing this requires that the leather have the proper moisture content. If too low the leather can get stress cracks in it.
3. Wrap the gun in plastic wrap to protect the gun from damage. If your gun is a polymer, stainless, nickel or a finish that is not damaged with water you do not need to wrap the gun. Make sure the gun has been cleared is before you start this process. Run an oil patch down the barrel if it's carbon steel to keep it from rusting. Once finished with the making of the holster, I would recommend you clean and re-oil your gun.
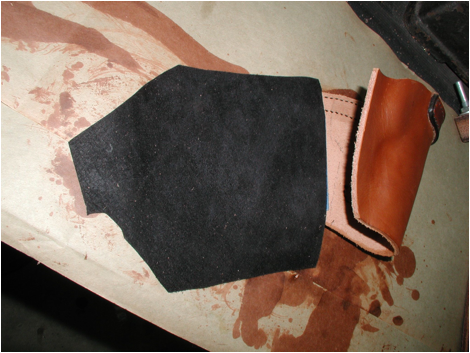
4. The molding process is called casing. In the olden days (before my time) the blacksmith/saddle makers would soak a piece of leather in water then stuff it in a container/barrel for the moisture to equalize. Some of the modern books today have you dunking the leather until fully soaked, then putting it in a sealed plastic bag over night to get a even moisture content. Then you will remove it when your ready to start. Depending on temperature and humidity it may be several hours before it's ready to use. My method is a lot quicker, but I have learned how to read the leather moisture from doing this for years. When the leather has a high moisture content, the leather will not hold it's shape, like a wet limp noodle. As the moisture content reduces it will start to stiffen and hold a shape. This starts to happen when the leather starts turning a lighter color. I use a spray bottle filled with water to spray the leather down till it gets enough moisture to be limp and pliable. If it dries out while I'm working with it I just give it another spray or two. This allows me to work a smaller area with out changing another. A sponge can be used instead of a spray bottle and not near as messy.
5. Cut a piece of leather to fill the gap on top the slide/barrel between the front and rear sight, tape it in place. This is to make the top of the gun flat so the leather will not dip in. The width of the leather filler should be close as possible to the width of the slide.
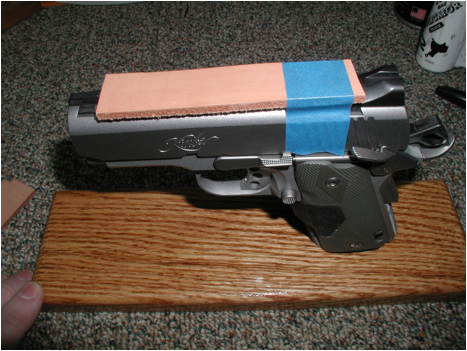
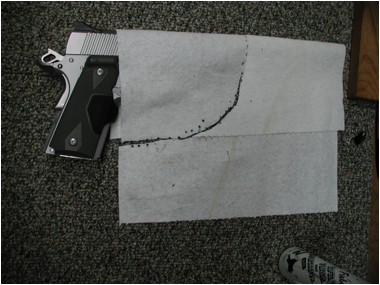
6. Now dampen the leather till it's soft and pliable. You can use a spray bottle, sponge or bucket of water to get the leather pliable. Wet it from the outside smooth surface. The leather will soak it up, keep adding water till you get it soft and pliable. Have one side laying flat against the smooth water resistant bench top and wrap it around the gun. I normally do this on a cutting board or a piece of Plexiglas. Use you thumbs to force the leather around the trigger guard and below the bottom of the slide and frame. Make sure you get it tucked in nice and tight below the trigger guard. Make sure you have it high enough up the gun, angling across from top of trigger guard to rear sight. At this time you can rough cut the leather smaller to make it easier to work with if you have a lot of excess. For this holster (Kimber UCII), I'm going to have it fairly low cut to match the front for easy access and draw. I will not need a sweat/body guard since this is a OWB holster and not in contact with the skin. Once the leather has dried enough to hold it's shape, remove the gun and let the leather dry over night. The leather will shrink back some during the drying process and open like a clam shell. This is fine because you want a snug fit any way. Once it's has dried, shape the holster opening to get the appearance you're after. In my case, I will cover the trigger guard and raise it a bit so the laser grip/sight will not hit the holster. Remember to allow enough clearance so you can grip the gun. This can be done on the final fitting. You limit the depth by the bottom of the trigger guard. On a revolver you normally cover the cylinder. Now days,I hardly ever use restraints on auto style holsters. This is because if you fit the holster right, you will not need one. If you want a loose fitting holster you will need to use restraints. If a gun is allowed to mover around in a holster, you actually get more wear on the gun.
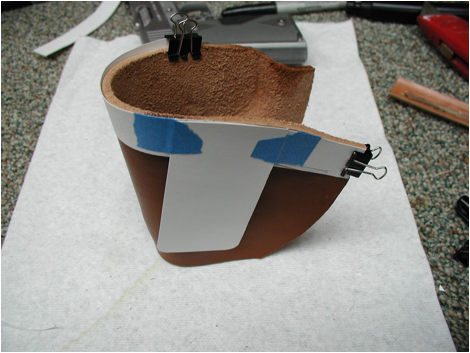
This gives you an idea on how far one will open up during the drying process. The black mark on the edge is where I want to stop the reinforce piece.

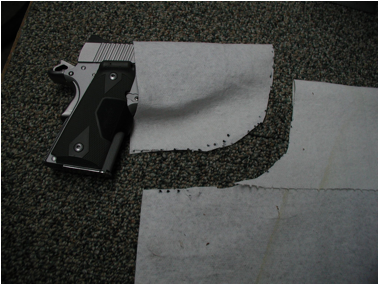
As you can see with this picture I have about ~1/2" extra length and the back edge is around 3/4"(where the binder clip is). Binder clips make great clamps but they can mark the leather, particularly if wet. This picture was taken with dye already applied, but it's best to apply at the end. I will show you why later on. Since adhesives do not bond well to dyed surfaces, I masked the top using tape. If you do not, you will need to scuff the surface prior to dying.
Some makers reverse the leather putting the smooth side in. This makes the gun draw easier like a lined holster but not as durable as pigskin. You can always slick up the flesh side using Gum Tragacanth.
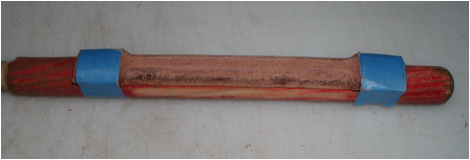
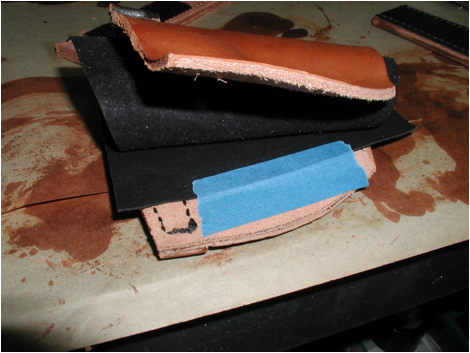
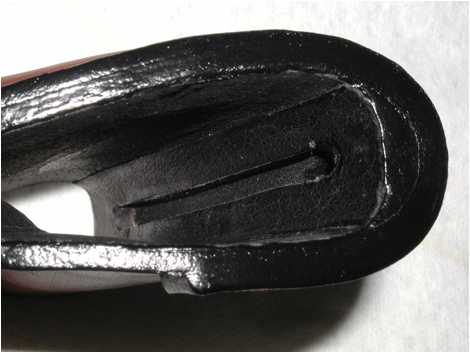
7. While the holster is drying I will start work on the sight ramp. These are a real pain to make. Every time I make one I try something different. This can be 2 simple strips of leather glued or stitched in or full contour piece. The method here is by far been the best. The height of the front sight governs the leather thickness. In this case I'm needing 3/16" or thicker. I have some heavy skirting leather I'm going to use, 1/4". If you don't have a piece of leather thick enough you can glue 2 pieces together. But you must shape them prior to gluing them together. The hard part of this is following the contour of the front of the holster that you do not know what the final shape will be. In my case I have a piece of wood that is very close to my slide/holster. This piece needs to be molded too. Being a thick piece of hard skirting leather I submerged the leather in water till the air bubbles quit coming up. I then started molding this to the wood stick. I taped it in place and set it a side to dry over night.
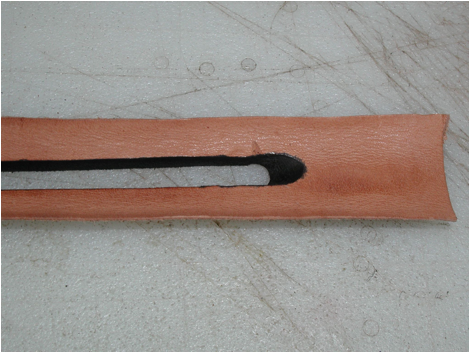
8. Once it dried I then took it to my belt grinder to taper the edges. Punched 2 holes marking the sight ramp length, then cut the strip out between the holes. I left this long so I would have something to hold on to when I glue it in place. At the top you need to slope the hole/slot. This is to make the front sight come out smoothly without the sight hanging on it. I applied some Edge Coat to the inside slot using a q-tip.
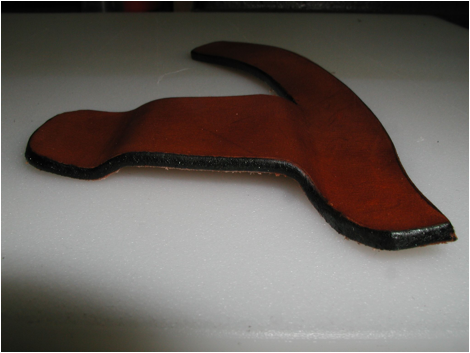
9. Now that the main body of the holster has dried, you need to make the reinforced piece that will hold the mouth open and the belt loop. You need to have clearance for your grip before continuing; this impacts the shape of the reinforced piece on the backside. I start by transferring the top edge all the way around to some construction paper. You should stop the reinforcement in front at the trigger guard. Then decide on how wide it's going to be. This is very seldom wider than 3/4-1". I used 3/4" on this holster. Use a marker and draw this depth below the top edge and cut it out. You now have a strip that follows the top edge of the holster. Now cut a piece of construction paper 1.5"-2" wide x 4" long for the belt loop. Wider the loop the more stable the holster will be. I use binder clips to hold this pattern to the leather while I decide what cant I want. I generally like the FBI cant. But I like to balance the gun in the holster for it to ride good, too. On heavy guns this is key or the gun will want to tilt the holster. Tape the loop in place.
Now look to see if your going to be able to assemble it. Yes it happens more than you would think, the front stitching ends up behind the belt loop. Is the belt loop going to hang over on the front curved part of the holster. If so you need to shape it for it to set on the flat section. You can thin or thicken the belt loop, taper the loop till you make it fit. In some cases you may have to change the cant. Are you going to be able to stitch along the bottom of the gun and trigger guard? Sometimes this gets into the belt loop. Once your satisfied take this pattern and cut a piece of leather to match using small radius at the belt loop transition. If you will be stitching all the way around on the front (next to gun and edge) you may want to shorten the reinforced part in back so it will not interfere with the front stitching.
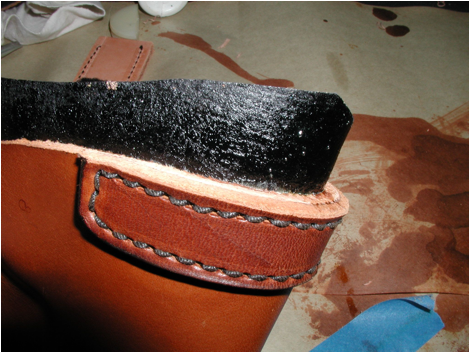
10. Now lets mold the belt loop into the reinforced piece. You will need to dampen the leather (both sides) so you can mold it over the same thickness and width of your gun belt. Make sure you get it wet enough so its easy to mold. Your trying to make 90° bends here so it needs to be very playable. If you do not get it damp enough you can split the outer fibers of the leather weakening it. Start the loop as high as you can go other wise it will loosen up. Once it has dried you can remove the excess leather on the belt loop and give it its final shape. Now clean/smooth/slick up the edges and apply edge coat. Do only the bottom edge and belt loop at this time. The top edge will be finished once it's glued to the body.
Here I have trimmed the bottom of the loop, edge finished.
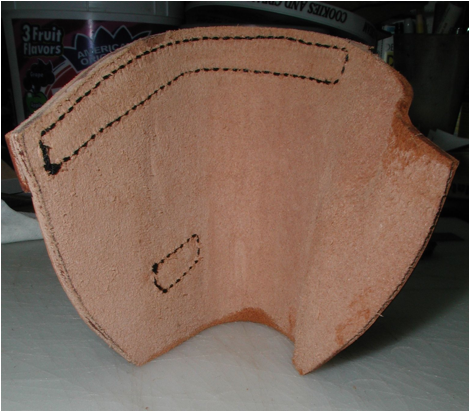
11. Now with the sight ramp shaped you can check the fitting. You want the leather molded as tight as you can get it around the trigger guard and below the barrel. If you need to shape some more, wet the leather and do it. Set aside and let it dry. Once dry trim off the excess along the edge, allow for sanding the edges even once it's glued together. I use scissors to trim the top and bottom edge. This can be done with a utility knife. The trick is not to force it, let the blade do the work. It may take 3-5+ passes to get through one layer. If you are gong to stitch the back edge punch the holes so the stitching alone the barrel and trigger guard flow all the way around. When you stitch the holster, you will start at the bottom along the gun (muzzle/slide) going all the way around till you make a complete loop. This will get you into the reinforced piece on the back so laying out your stitches will be tedious.
Caution: Leather dyes do not penetrate adhesives. So you need to be careful with the adhesives. If your using the water base glue, get a damp rag ready just incase you needs it. The water base glue will give you a tighter glue joint. To get the best adhesion you will need to scuff the smooth surface.
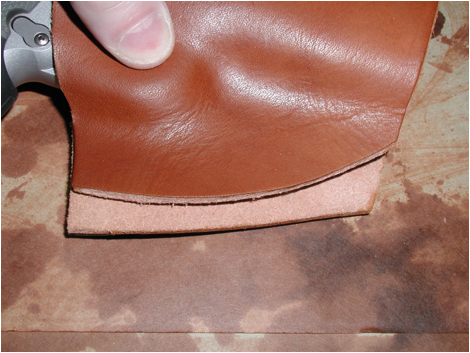
12. Now it's time to attach the reinforced piece to the main holster. I elected to use the back edge as my reference, starting point. I cut and finished the reinforced part 1/8"-1/4" short in front. To make it align up in front, open the holster up slightly. You can use either adhesive here. But for this application it's not necessary to scuff. All we are looking for is to hold the pieces together so we can sew them together. Let it set for a few minutes before taking it to the sander to clean up and even the top edges. Time to sew. My Adler 205 sewing machine made quick work of this. Otherwise you are punching holes to hand stitch. When using the diamond shaped punches, start at the front top edge on the reinforced piece and work toward the back. Use a piece of scrap for the punch to go into. There is a sheet of heavy (1/4") dense rubber used as pound boards. This board is dense enough not to adsorb the energy but soft enough for the tools to penetrate without dulling them. Use dividers or calipers to make a faint scribe line 1/8" from the edge. If you have the thread recessing grove tool, use it on the inside after you punch the holes. Recessing the thread will prevent the gun from contacting the thread and give you a flat smooth surface inside the holster. If you need to adjust the spacing to make things line up, do it on the back where it want show.
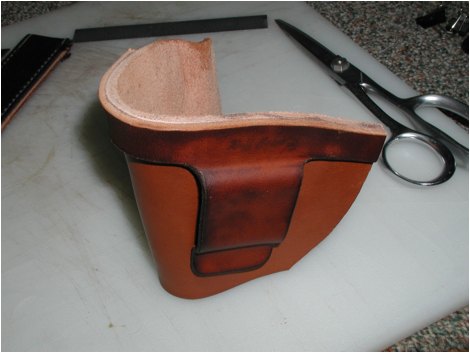
This is a picture with the reinforced piece glued in.
From here I will take it to my big Adler Sewing Machine to stitch. If you have a place that does boot/shoe repair they may sew it for you.
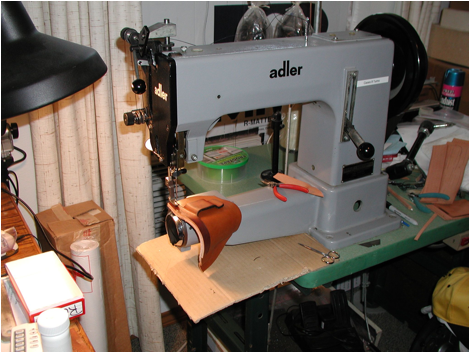
This Adler sewing machine will handle 5/8" thick leather. Weighs in at over 130lbs. I'm using a Nylon thread in my sewing machine, size 346 top, 277 bottom. This is the size thread used to sew boot soles on.
Notice the difference in the dye between the 2 pieces of leather. This is the same dye but from 2 different hides. The lighter one will darken some with a second coat, and conditioner applied.
13. Smooth the stitching out on the inside of the holster. This is done by dampening the leather around the threads and rubbing it smooth with a slicker tool or something smooth and hard. Another way is to tap it with a ball peen hammer to flatten the thread. Make sure the outside surface it on a clean smooth hard surface, it your going the hammer route. You can use the ball end to smooth the threads out too. If you used the stitch groover tool you do not have to do this step
14. Gluing in the liner can be a tricky ordeal. With contact cement if it touches the mating surface it's stuck. The way I do it you, get it right the first time. Once the liner is in you no longer have easy access to the inside of the holster. The liner covers all the stitching to give the gun a nice smooth surface to contact. I use contact cement for gluing the liner in. You start on the back and roll it toward the front forcing it to stretch into the trigger guard. Do not use the white glue here. It will seep through the fine holes in the pigskin. It's not recommend to take the liner all the way to the back edge either. Try to end the lining around the trigger guard with out going into the stitching space. The reason is stretching the pigskin over the guard will pull the liner loose in the guard. Pigskin is not a dense material and will not give you a tight clean glue edge.
Note the use of tape. This is what I use to hold every thing aligned while I apply the contact cement.
The exposed surfaces are ready for the contact cement. Once the leather and pigskin are covered with contact cement (2 coats due for the porous surfaces), roll the surface on working to the front.
You have to walk the liner into the trigger guard area. If it contacts before you get it in place you may end up with air pockets. I normally hold pressure on this area for a while to ensure it's stuck down solid.

Now if the shape of the holster puts stress on the top edge and tries to pull away, you can cut slits in the lining for relief. The front edge on this holster is very straight and is not needed on this holster.
Contact cement gets stronger with time. I allow it to set overnight before I do any trimming. I use a utility knife to trim off the excess liner.
15. Now it's time to close the holster. Do one final fitting with the sight ramp in place to get the stitch line. I set this very tight, like 1/8" tighter than you think it should go. I use a 3 & 1 diamond shape punch to space the stitching along the bottom edge of the barrel and trigger guard. Remember the trigger guard is what will keep the gun from going too deep. The gripping should come from the bottom 2" of the gun (muzzle end). So once the gun is backed out that distance it becomes loose. If I had room I would use my sewing machine here but it's not going to happen on this one. It's always best to glue then punch the holes. That way your holes will always align up. Use the white cement here. If your punches are too short to go all the way through the multiple layers you can use an awl or nail to punch through the lower layers. Normally the only time you need to do this is when you go over 2 layers. If your stitching is going to be in the path of your belt I recommend you to grove it so it recesses. Clean up the outer edge and slick. Lay out a light scribe line 1/8" from the edge. Punch holes along the edge or slots for lace.
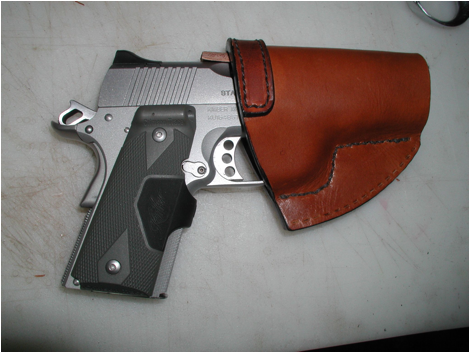
A quick check on fit, as you can see it barely starts in the holster. You can faintly make out where the muzzle is.
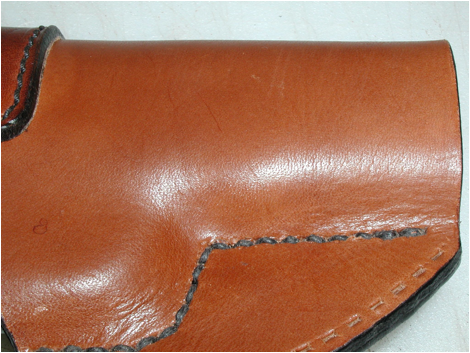
This photo shows the sharp angle around the trigger guard and bottom of the frame/slide. And you can faintly see where the frame to slide at the muzzle end is, ~1" from trigger guard. If you were stitching all the way around you would have holes at the corners tying the 2 stitches together.
16. Wet the holster down in front and outer face well and do the final sizing. Make sure you soak the reinforcing strip along the front good so you don't put stress cracks in the leather. To get the gun in I put the holster on a flat surface and pushed till it bottoms out. You need to let it dry with the gun in the holster.
17. I covered the sight ramp with pigskin too. It hangs over the edge of the sight ramp ~1/16". Use white glue and cleaned up the seep through with a damp cloth.
18. Install the sight ramp using white glue. Use a wet rage to clean up any excess glue. Trimmed off the excess length, smoothed, and slick.
If you look closely at the edge you can see the glue lines. This is due to 2 things. I used contact cement vs the white glue. Contact cement will never give you a tight seam due to a thicker glue line. Also pigskin is not a dense hide. Even using the white glue it will still show.
19. Now is the proper time to dye the leather. Keep it out of the inside of the holster and back of the belt loop. To protect the back of the belt loop use tape. If you use the Pro Oil Dye, you will only need 1 coat. The Low VOC dye can cover in 1 coat too if you apply it heavy. Let both of these dry over night. You can add a second coat the next day after buffing the surface with a cotton rag or sheepskin. If you did a second coat allow it dry overnight again, then buff to a shine. I use sheepskin as my dye applicator. It holds a lot of dye. As the leather dries it will lighten, so try to keep from going back over the dyed surfaces.
20. Now finish up on all the edges. If all were smoothed, you may only need to apply the edge coat.
Finishing up...
How tight is the holster well lets see.
Just the fit I was looking for.
As you can see it still lacks over 1" before it's fully seated.
21. Apply 2 coats of Leather Conditioner Preserver to the leather.
The picture on the left (front view) does not have the conditioner applied. The picture on the right has the Leather Conditioner Preserver was applied. You can see the blotchiness that was on the reinforced/belt loop has cleared up after the conditioner was applied. The front did not clear up completely.
Using a conditioner on vegetable tanned leather is required. The tanning process removes the oil from the hide, the reason it is almost white. The oil needs to be replaced. Every time leather gets wet you float some oils out of the leather making it drier. It is important to put these oils back in the leather to keep it from drying out further and getting dry rot cracks.
I use a product by Lexor for my finish. It is a mixture of Oil and Waxes to condition and preserve the leather. Once applied it makes the holster repel water. This is very similar to Mink Oil. With the inside of the holster lined the holster is almost completely sealed up. The areas not protected are the stitching holes and lace slots. Neet's Foot Oil can be used too but over use (more than twice a year) can actually damage the leather. NeetsFoot oil will darken the leather more than most conditioners. There are some water based finishes that will water proof the leather too. These are used like a Lacquer on tooled leather so it does not change the color. It your going to use a water base finish it's best to use some Neetsfoot oil before sealing it up. Fiebing and others makes a very good finish too.
The holster will loosen up with use. This process can be accelerated by using spacers. Leather can stretch far more than you realize, like in excess of 25% if pushed. So this makes it hard to make a holster too tight. But you do need to stretch it slowly to prevent stress cracks.
Q & A
-
What causes blotching in the dye?
-
The blotching of the die happens quite often if your use the low VOC Dye and wet the leather multiple times. What I think happens is the pigment is loosen from the carrier and is moved to different areas by the water. The application of the Leather Conditioner and Preservative will darken it up removing most of these. Of course if you wait till the very last thing or use the Oil base dye this does not happen. Then again if you wait to the last to apply the dye, any glue hitting the surface will impede the dye even if you clean it up. The residue left behind can cause spots. You just have to be careful when you use adhesives of any kind. If you noticed early on the reinforcing piece was blotchy from the first coat of dye. Since I did not use a cleaner the oil content was different in these areas from the molding process.
-
-
What's the best Dye?
- The Fiebing's Professional Oil Dye is the best.
-
Why use a sight guide?
- With out a sight guide the front sight will gouge the leather when you remove the gun. Some front sights have a very sharp edge and that just cuts the leather will ease.
-
What gives the holster the best fit?
- Good fit is the results of several things. The most important is the fit of the muzzle end of the gun to fit snugly. Also the area around the trigger guard generally limits the depth the gun goes in. When it's right, the gun is held firmly enough so you can hang or run without fear of the gun coming loose.
-
Why use a liner?
- A pigskin liner is very tough and soft at the same time. It can add tension as well as smoothness for draw. Pigskin is also easy on gun finishes, less abrasive.
-
Why do I make a flat back holster?
- In most cases this type of holster is more comfortable to wear and puts less wear on the gun.
-
What do you do different for a revolver?
- The main difference is the addition of a filler piece along the back of the holster. This will have a taper, getting larger as you go around the trigger guard. On cheap holsters they do away with the filler piece.
- Depending on the size of the revolver, I may or may not have a flat back. In most cases if your using a filler, it will be sized evenly between the front and back.
- The holster will be one piece design with the belt loop coming off the back.
- It will have a gun restraint. I prefer these over the trigger guard, give a cleaner look. But if the holster for CC use, you want it across the hammer section so you can release it with you thumb when you draw the holster.
-
How do you loosen up a holster without getting it wet.
- Apply Neetsfoot oil to the holster to loosen it up. Then cut a 1" strip of cloth from a cotton T-shirt as a spacer. Press the gun into the holster using the Tee Shirt as a spacer on top the slide. Also twisting the gun at different angles can also loose a holster up. If you have a gun you want to protect the finish, cover it with tape then use the spacer to expand the holster.