I have been avidly reading this forum now for 4 months. Have two month old Mark III Competition Target 6 7/8 stainless slab side. Installed VQ extractor no problem. Solved all stove piping problems. Installed VQ accurizing kit - new trigger, plunger, spring, sear, sear spring, hammer. Did not install the larger bolt release lever. After installing everything, inserted empty magazine, put safety on fire, and was able to rotate hammer manually forward. Then I completed the reassembly.
At range today. Pull trigger bang. Pull trigger no bang. Round in chamber. Manually rack bolt. Unspent round ejects. Pull trigger bang. Pull trigger no bang. Manually rack bolt. Unspent round ejects. Pull trigger bang. Identical pattern for entire 10 round magazine. Any round I manually racked went bang.
Noticed the following which may be due to my heightened state of "what did I do wrong" thinking. The hammer pivot pin was not completely seated on the right side of the grip. The left grip did prevent the pin from completely coming out. IF I pushed the hammer pivot pin in completely with my fingernail whenever I had a no bang condition, and then pulled the trigger, I got a bang. This was consistent throughout for 40 rounds. Once I pushed the pin back completely in, it would stay there for a couple shots but then unseat a bit from right side. At this point I cannot remember if this normally was the situation or not.
Also I have little understanding of where the "Pre-Travel" screw is supposed to do. Not that sure exactly what it does. As a result of my ignorance, I most likely don't have it adjusted correctly.
While it might sound odd, I'm having a blast with the pistol and learning how the parts work together. And to think I waited until I was 61 to have so much fun.
Any enlightenment that those brighter than me can shed on this will be greatly appreciated. Will be at the range tomorrow early with my brand new Marlin 39a. Hey, I have to make up for lost time.
Mark III Volquartsen Accurizing Problem
Moderators: Bullseye, Moderators
-
bigislandbob
- New member

- Posts: 8
- Joined: Fri Jan 30, 2009 10:38 am
- Location: Hawaii - NW Connecticut


This doesn't sound odd of all. The questions you have are very good ones. Is your left grip panel screwed in tightly? That hammer pivot pin should not be working itself loose because the grip holds it tight into the frame.
What you're experiencing is a classic example of the pretravel being set a little too tightly. There are also a few other possibilities too. The basic reason why the pistol is not firing 100% is because the disconnector lever is not engaging the sear. This can be caused by the trigger plunger and spring in the new trigger. Too little upward force from these parts will cause the exact same problem. You can try reinstalling the factory plunger and plunger spring into the VQ trigger, this may solve the problem.
Another possibility is the disconnector lever is sticking and needs cleaning behind it. Also be sure to check that the Mark III magazine disconnector lever is not interfering with the trigger disconnector's movement.
Lastly is the pretravel adjustment. The pretravel adjustment is designed to set the trigger part of the way back from the trigger guard. This minimizes the amount of travel the trigger moves to release the hammer. But the distance has to be enough for clearance of the trigger's disconnector lever to reset and engage the sear. This is a delicate adjustment. You want to remove as much movement as possible but leave just enough to keep the trigger functioning all the time. Usually this translates to about 1/8 to 1/16th of an inch of trigger movement before the sear is moved by the trigger.
The upper set screw is the part that restricts how far forward the VQ trigger can return after the hammer releases. More screw, means the trigger is restricted from traveling forward as much as before. Less screw and the trigger can travel farther forward, requiring the operator to take up that slack each time the trigger is pulled. This adjustment is best performed with the receiver off the frame. That way you can manually adjust the travel and ensure the disconnector lever raises up every time. You just have to manually cock and catch the hammer with your thumb each time the trigger is squeezed. Once you have the trigger adjusted then you want to apply a little blue locktite to the threads to keep it fastened in place. Otherwise it will walk later and may cause a hang-up.
Hope this helps.
R,
Bullseye

-
bigislandbob
- New member
- Posts: 8
- Joined: Fri Jan 30, 2009 10:38 am
- Location: Hawaii - NW Connecticut
Thank you Bullseye for speedy reply.
Left grip panel is fully screwed in. With it fully screwed in there is about a match book thickness between left grip and top of hammer pivot pin. The pistol came with right hand grips and I bought Ruger left hand grips. When I had problem I switched back to right hand grips at range. Both sets of grips, on the left side have the same match book thickness between grip and top of pivot pin when fully screwed in. I suspect that the hammer pin "unseats" slightly due to pretravel misadjustment. Just a gut feel from what you said above.
Actually I enjoy taking the pistol apart so replacing VQ trigger plunger and spring with original not a problem. Will double check disconnect lever for cleanliness.
Question on adjusting pretravel with receiver off. How do you "You just have to manually cock and catch the hammer with your thumb each time the trigger is squeezed." Specifically the manually cock part? Catch the trigger with thumb I do understand.
Would I be correct in thinking that if I backed the pretravel screw out, or downward in relation to the receiver, that this would result in more slack. While more slack would not be ideal, wouldn't more slack result in a pistol that consistently went bang, bang, bang?
Here's a picture to assist with the process of manually cocking the trigger. Basically you're taking the place of the bolt with your thumb.
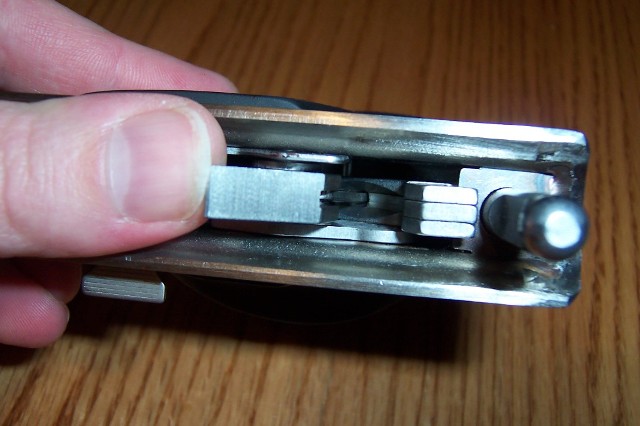
During this process you must also ensure that the hammer strut stays on the mainspring cap.
Backing out the screw is less desirable but will increase engagement reliability if the pretravel is mis adjusted and causing the poor detonation problem.
R,
Bullseye
During this process you must also ensure that the hammer strut stays on the mainspring cap.
Backing out the screw is less desirable but will increase engagement reliability if the pretravel is mis adjusted and causing the poor detonation problem.
R,
Bullseye
-
bigislandbob
- New member
- Posts: 8
- Joined: Fri Jan 30, 2009 10:38 am
- Location: Hawaii - NW Connecticut
Much appreciate the picture. Never would have I have figured that one out myself. It's snowing heavily here so down to the basement to see if I have understood your directions. It was supposed to be rain. May not hit the range until Saturday now.
Your answer to backing out the pretravel screw confirmed the direction I need to go to reduce pretravel - IE the further up the screw, the less the pretravel.
Thank you very much for your assistance.
Your answer to backing out the pretravel screw confirmed the direction I need to go to reduce pretravel - IE the further up the screw, the less the pretravel.
Thank you very much for your assistance.
-
greener
Welcome to the forum, bigilsandbob. Bullseye's description and diagnosis is exactly what I've seen in when I've had the pretravel screw too tight or had it walk in when I didn't use blue loctite.
Bullseye's description of how to adjust the pretravel screw is much more elegant than my "get it close and take the allen wrench to the range for final adjustments" technique. Bang, adjust, bang, adjust, no bang, adjust, bang...
Couple of comments from my klutzy attempts at trying Bullseye's technique. Took me few tries to get the thing assembled properly. With the receiver and bolt off the grip frame, the hammer tends to go a little too far forward for the hammer strut to fall into the groove on the mainspring assembly. You have to maintain the hammer forward, but not fully forward. You also have to keep the hammer from going fully forward on assembly. When you "test fire" you need to keep the hammer from going fully forward or the strut will come out of the mainspring groove.
You can also check the disconnector when you are doing this.
PS. I readjusted my MKIII 22/45 using Bullseye's instructions, but I'm still taking the allen wrench with me to the range. The 22/45 doesn't trust its mechanic.
-
bearandoldman

- Ye Loquacious Olde Pharte

- Posts: 4194
- Joined: Tue Aug 16, 2005 10:30 am
- Location: Mid Michigan
That's the way I adjusted all of my 22/45's, mine have the stock trigger that I added a pretravel screw to. Mine are all MarkII's so do not need to insert a mag to test. On the 22/45 due to the way the polymer frame is made you do not have as much problem with the hammer spur and the mainspring housing. I am not going to field strip the receiver off the frame at the range and remove the trigger to adjust the screws.
You have great day and shoot straight and may the Good Lord smile on you.
-
bigislandbob
- New member
- Posts: 8
- Joined: Fri Jan 30, 2009 10:38 am
- Location: Hawaii - NW Connecticut
Thank you both. Been muttering under my breath downstairs wonder why the hammer will not move when I can plainly see that the sear has released. I think I have spent the last hour pushing it too far back.
Thank you for confirming the very confusing at first "hammer strut and where does it belong" confusion in my aging brain.
I have assembled per Bullseye instruction above.
Here is question which you may have already answered.
I push back on the hammer. I hear a click. If I stop pushing at that point, the hammer top is not level with the top of the frame. Here is the $64 dollar question - When the hammer is cocked, is it cocked at the first click so that it is not level with the frame? If viewed from the side you can see the hammer angled back but sticking up above the frame.
In this position, if I pull the trigger and have my trusty bruised thumb in place to catch the hammer, the hammer does come up and over.
If I push the hammer alllll the way back so that it is level with the frame, when I pull the trigger the sear does release but the hammer does not move at all. Then to get the hammer to move I have to push down on the top of the hammer right above where the sear is.
So which hammer position is defined at cocked?
-
bigislandbob
- New member
- Posts: 8
- Joined: Fri Jan 30, 2009 10:38 am
- Location: Hawaii - NW Connecticut
Replaced VQ trigger plunger and VQ trigger plunger spring with originals. Immediately saw a difference in disconnector functioning. A lot of slop disappeared immediately. The original trigger spring seems a hair longer than the VQ one.
Then I was able to set the pretravel screw so that hammer goes off with about quarter inch of pull on trigger. Fascinating watching everything work with receiver off and bolt off. Will further play with screw tomorrow when both eyes open.
Both caused no bang problem. The bigger cause of the two was the VQ pieces. Interestingly my son, the one who actually got me shooting four months ago, had a similar problem with his 10/22 and a VQ accurizing spring. He went back to original spring - problem solved.
At least that is my belief at moment until I get to range.
And the trigger feel, even with all the no bang problems I had at the range this morning was greatly improved over the original. I suspect that I'll even feel more of an improvement now.
Thank you gentlemen for your gracious assistance.
To your question a while back, the hammer is not level with the frame when cocked. This link shows a cocked hammer in the frame http://www.guntalk-online.com/images/m3innomen.JPG You can see that the hammer is angled at about 30 degrees to the top of the frame.
Glad to hear that the original spring and plunger appear to have solved the problem.
R,
Bullseye
Glad to hear that the original spring and plunger appear to have solved the problem.
R,
Bullseye
-
bearandoldman
- Ye Loquacious Olde Pharte
- Posts: 4194
- Joined: Tue Aug 16, 2005 10:30 am
- Location: Mid Michigan
Got to thinking last night and that is a lot of work for an oldman, wee Bear tried to help but he said, dogs are really not required to think s lot.
I have always used that method to adjust the screws as my triggers are all stock 'Ruger with the pretravel added. The only thing that crossed my mind last nigh was the fact that I always did it without the main spring housing installed, just used my thumb to tension the hammer in both directions, must be it allowed me to feel the action better without the tension of the main spring. None of them have ever needed to be readjusted, although maybe I should do the one that is a little extra sensitive, although it has never failed I have had some quick double taps with it. Now if I could just remember which gun it is.
I have always used that method to adjust the screws as my triggers are all stock 'Ruger with the pretravel added. The only thing that crossed my mind last nigh was the fact that I always did it without the main spring housing installed, just used my thumb to tension the hammer in both directions, must be it allowed me to feel the action better without the tension of the main spring. None of them have ever needed to be readjusted, although maybe I should do the one that is a little extra sensitive, although it has never failed I have had some quick double taps with it. Now if I could just remember which gun it is.
You have great day and shoot straight and may the Good Lord smile on you.
-
bigislandbob
- New member
- Posts: 8
- Joined: Fri Jan 30, 2009 10:38 am
- Location: Hawaii - NW Connecticut
Thank you Bulleyes for the link to the picture of a cocked hammer. Had that picture printed out already but wasn't sure if it was cocked. I've always enjoyed learning how mechanical devices work and the past few days have been very educational. I don't think anything I've learned will make my hand steadier or my eyes sharper but knowing how the pieces work together will enable me to adjust the pretravel screw properly. My only regret with shooting is that I didn't take up my son's offer 10 years ago. There is an indoor range in town and I just might wander down there once I reassemble the Mark III and see how things go bang. More fun than I ever thought possible.
Bearandoldman - Having the mainspring installed was fascinating. Watching all the parts work. Now I completely understand the mechanics. For me it was worth the extra few minutes of fussing.
Thank you all.
Bearandoldman - Having the mainspring installed was fascinating. Watching all the parts work. Now I completely understand the mechanics. For me it was worth the extra few minutes of fussing.
Thank you all.
-
bigislandbob
- New member
- Posts: 8
- Joined: Fri Jan 30, 2009 10:38 am
- Location: Hawaii - NW Connecticut
An update - SUCCESS! Pretravel adjusted appropriately and 500 various types of 22 ammo rounds went down range with complete success. Even had 50 rounds of Fioochi HV hollow point (a brick of which was ordered by me by mistake but it works great in the Marlin 39a) make the transition and implant itself on the berm behind the target. Will be back at range tomorrow with son who has gauge to measure trigger pull.
I was thinking, kind of dangerous at my age, that the VQ disconnector that has taken some ribbing on the forum might actually work as advertised. Here is why I'm thinking that.
I installed the VQ accurizing kit. Noticed a lot of slop in disconnector movement when adjusting pretravel with the VQ trigger plunger and spring. Per your accurate instruction, I put back original trigger plunger and spring and slop went away. Could it be that if the VQ disconnector was installed along with all the VQ parts, trigger plunger and spring included, the slop that I saw would not exist? It would be interesting to compare the VQ disconnector and the Ruger disconnector with the appropriate gauges to see if in fact there were measurable differences.
Last I looked I think the VQ disconnector was a princely $30 or so. I just might order one, install it and reinstall the VQ trigger plunger and spring and see what the result would be. But then I'd have to give up shooting the Mark III for a day or two. Guess that little job will wait until next January.
Thanks again for all the on target assistance.